Hallo alle zusammen, after a long time I’m writing this blog and I come with an interesting and long post
I know what you are thinking, I steal Kelsey Hightower’s Kubernetes The Hard Way tutorial, but hey!, I did some research and try to fit K8s cluster(Multi-Master!) in a laptop with Docker as ‘CRI’ and Flannel as ‘CNI’.
This blog post follows Kelsey Hightower’s Kubernetes The Hard Way, I highly recommend go through his repo. I’m writing this blog post to keep it as a reference for me and share it with other people who want to try it. So, feel free to correct me if there are any mistakes and ping me for any queries. This series is divided into 3 parts and all configuration/scripts are available in my github repo. Well, that has been said, let’s start building the cluster.
Below is my laptop configuration. Make sure you have enough resources on your laptop. (or depends on resources, you can reduce nodes in the cluster, etc.)
| Laptop | Acer Predator Helios 200 |
|---|---|
| CPU | Intel Core i5 8th Gen |
| RAM | 8 GB |
| Host OS | Ubuntu 18.04 |
| Hostname | ghost |
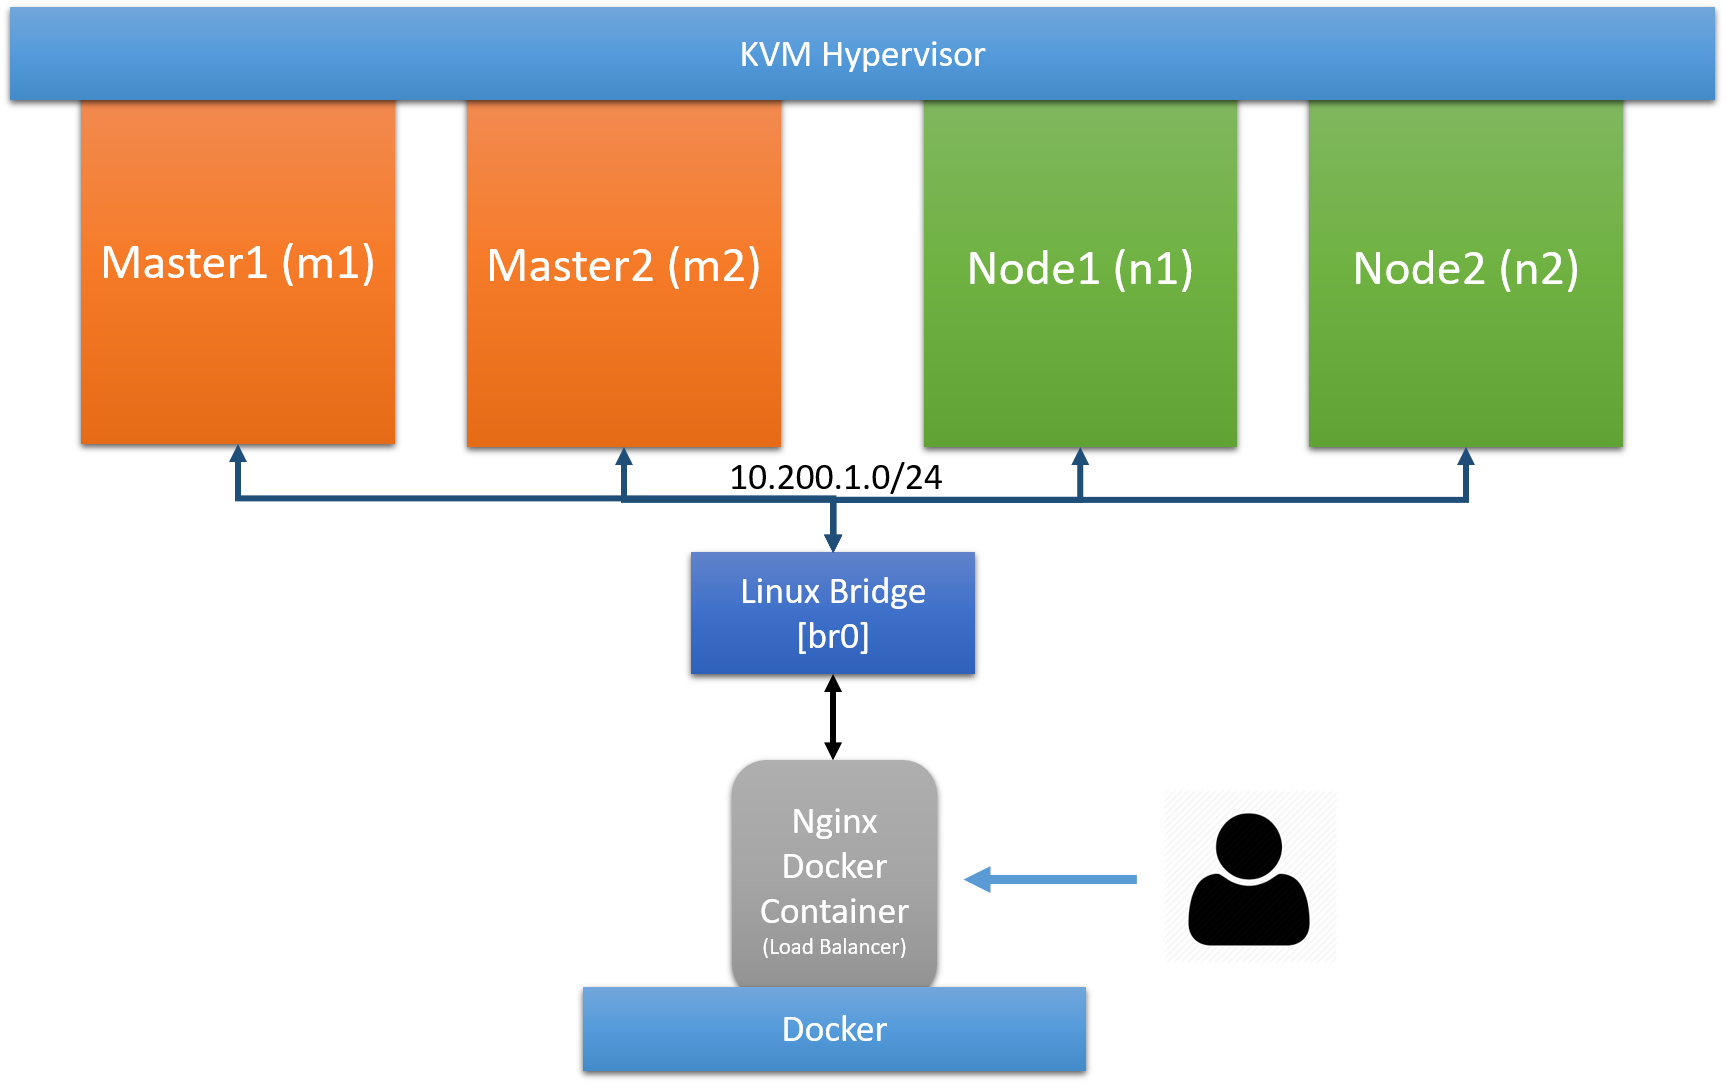
First let’s talk about the cluster in Kubernetes The Hard Way which has 3 controller nodes, 3 worker nodes and a load balancer on GCP. I want to deploy a cluster with multiple masters, but I was afraid it is too much for my laptop. So, I reduced it to 2 controller nodes, 2 worker nodes (or VMs in my case) and replaced the GCP load balancer with the nginx docker container as a load balancer, the clusters look like below.
1. Prerequisites
Installation of packages
*NOTE: The following components will be installed on host machine(laptop)
Install KVM hypervisor.
$ sudo apt-get install qemu-kvm quem-system \
        libvirt-bin bridge-utils \
        virt-manager -y
Install Docker, because we want to run nginx load balancer container on host
Install cfssl and cfssljson binaries
$ wget -q --show-progress --https-only --timestamping \
  https://pkg.cfssl.org/R1.2/cfssl_linux-amd64 \
  https://pkg.cfssl.org/R1.2/cfssljson_linux-amd64

$ chmod +x cfssl_linux-amd64 cfssljson_linux-amd64
$ sudo mv cfssl_linux-amd64 /usr/local/bin/cfssl
$ sudo mv cfssljson_linux-amd64 /usr/local/bin/cfssljson

$ wget https://storage.googleapis.com/kubernetes-release/release/v1.12.0/bin/linux/amd64/kubectl
$ chmod +x kubectl
$ sudo mv kubectl /usr/local/bin/
Subnets
In the official “Kubernetes The Hard Way”, cluster network configuration is done via gcloud and obviously we are not
going to use it. We have to choose subnets manually for our cluster nodes, CIDR for pods and K8s services. So, here is
what I come with | No. | Name | Subnet | | — | ————————— | ————- | | 1 | Cluster Nodes |
10.200.1.0/24 | | 2 | POD CIDR(cluster-cidr) | 10.100.0.0/16 | | 3 | Service(service-cluster-ip) | 10.32.0.0/24 |
Linux Bridge & NAT
As you can see in the above diagram, we are going to use a linux bridge to connect our VMs and Nginx docker container.
Also, we need to do NATing for our VMs in order to access
the Internet.
$ EXTERNAL_IFACE="wlan0"

## Enable ip forwarding
$ sudo sysctl net.ipv4.conf.all.forwarding=1

## Create br0 bridge
$ sudo ip link add name br0 type bridge
$ sudo ip link set dev br0 up
$ sudo ip addr add 10.200.1.1/24 dev br0

## iptables NAT configuration
$ sudo iptables -t nat -A POSTROUTING -o $EXTERNAL_IFACE -j MASQUERADE
$ sudo iptables -A FORWARD -i $EXTERNAL_IFACE -o br0 -m state --state RELATED,ESTABLISHED -j ACCEPT
$ sudo iptables -A FORWARD -i br0 -o $EXTERNAL_IFACE -j ACCEPT

## Bridge config. Read more @ https://tinyurl.com/yan5jnd4
$ sudo sysctl -w net.bridge.bridge-nf-call-arptables=0
$ sudo sysctl -w net.bridge.bridge-nf-call-ip6tables=0
$ sudo sysctl -w net.bridge.bridge-nf-call-iptables=0
In order to launch docker container(nginx load balancer container) on different linux bridge(other than default
docker0), we need to create a docker network and specify that network while launching the container. Below command
creates docker network with br0 as bridge
$ docker network create --driver=bridge \
        --ip-range=10.200.1.0/24 \
        --subnet=10.200.1.0/24 -o "com.docker.network.bridge.name=br0" br0
Create a workspace directory
We can save all configuration and generate certificates in this directory
$ mkdir ~/kubernetes-the-hard-way
$ cd ~/kubernetes-the-hard-way
2. Provisioning Compute Resources
Specify cluster info(hostname, IP and user to login) in controllers.txt and workers.txt files respectively like in
below. In the same way, add those VM IPs in /etc/hosts file like below. These files are useful to automate things like
copy files to nodes or generating certificates for these nodes, etc. You will see it in a moment.
$ cd ~/kubernetes-the-hard-way

$ cat controllers.txt
m1 10.200.1.10 veeru
m2 10.200.1.11 veeru

$ cat workers.txt
n2 10.200.1.13 veeru
n2 10.200.1.14 veeru

$ cat nginx_proxy.txt
proxy 10.200.1.15

$ cat /etc/hosts
127.0.0.1    localhost
127.0.1.1    ghost

10.200.1.10 m1
10.200.1.11 m2
10.200.1.12 n1
10.200.1.13 n2
10.200.1.15 nginx
Below are the IPs, hostnames and usernames for the nodes that I choose | Node Role | Node Hostname | Node IP | Node Login Username | | —————————— | ————- | ———– | ——————- | | Controller | m1 | 10.200.1.10 | veeru | | Controller | m2 | 10.200.1.11 | veeru | | Worker | n1 | 10.200.1.13 | veeru | | Worker | n2 | 10.200.1.14 | veeru | | Load Balancer(nginx Container) | proxy | 10.200.1.15 | N/A |
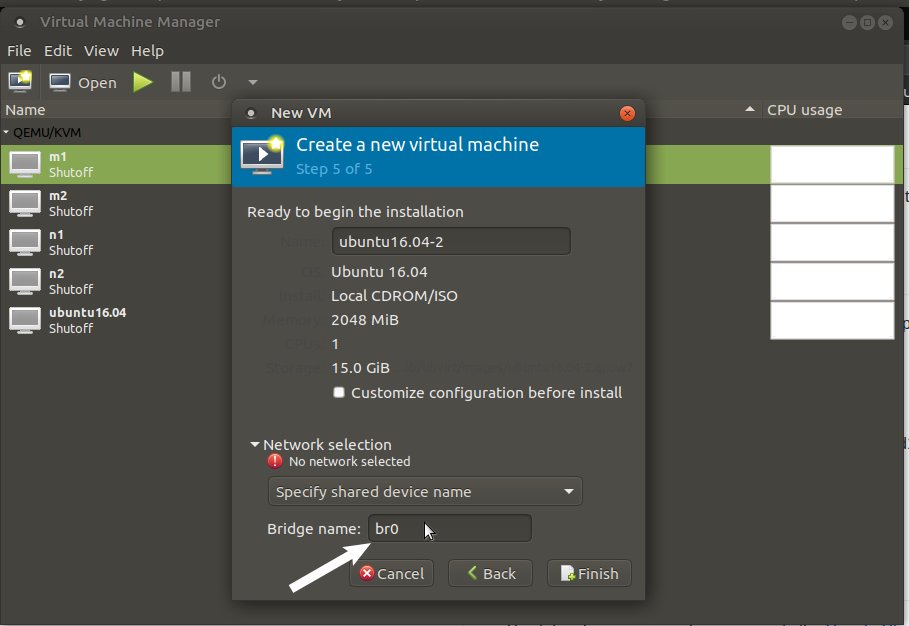
- Download Ubuntu 18.04 server
.isofrom https://www.ubuntu.com/ - In the previous section, we installed the kvm hypervisor and now let’s spin up 4 VMs and specify the bridge name under the network section like in the below screenshot. (I used “Virtual Machine Manager” GUI to launch VMs)
*I’m not covering OS installation in VM. You can easily find it on the Internet.
*NOTE: While installing OS, please select static IP and specify IPs according to their node names
*TIP: Install OS in VM and clone VM 3 times
Once the OS installation is completed, check the connectivity between the host-VM and VM-VM and you should be able to ssh both host-to-VM and VM-to-VM. For convenience, you can copy ssh keys, so that you don’t have to enter a password every time.
$ ssh-keygen
$ ssh-copy-id guest-username@guest-ip
3. Provisioning a CA and Generating TLS Certificates
It is a good practice to set up encrypted communication between the components of K8s. In this section, we will create public key certificates and private keys for the below components using CloudFlare’s PKI toolkit as we downloaded earlier. (Know more about PKI)
- admin user
- kubelet
- kube-controller-manager
- kube-proxy
- kube-scheduler
- kube-api
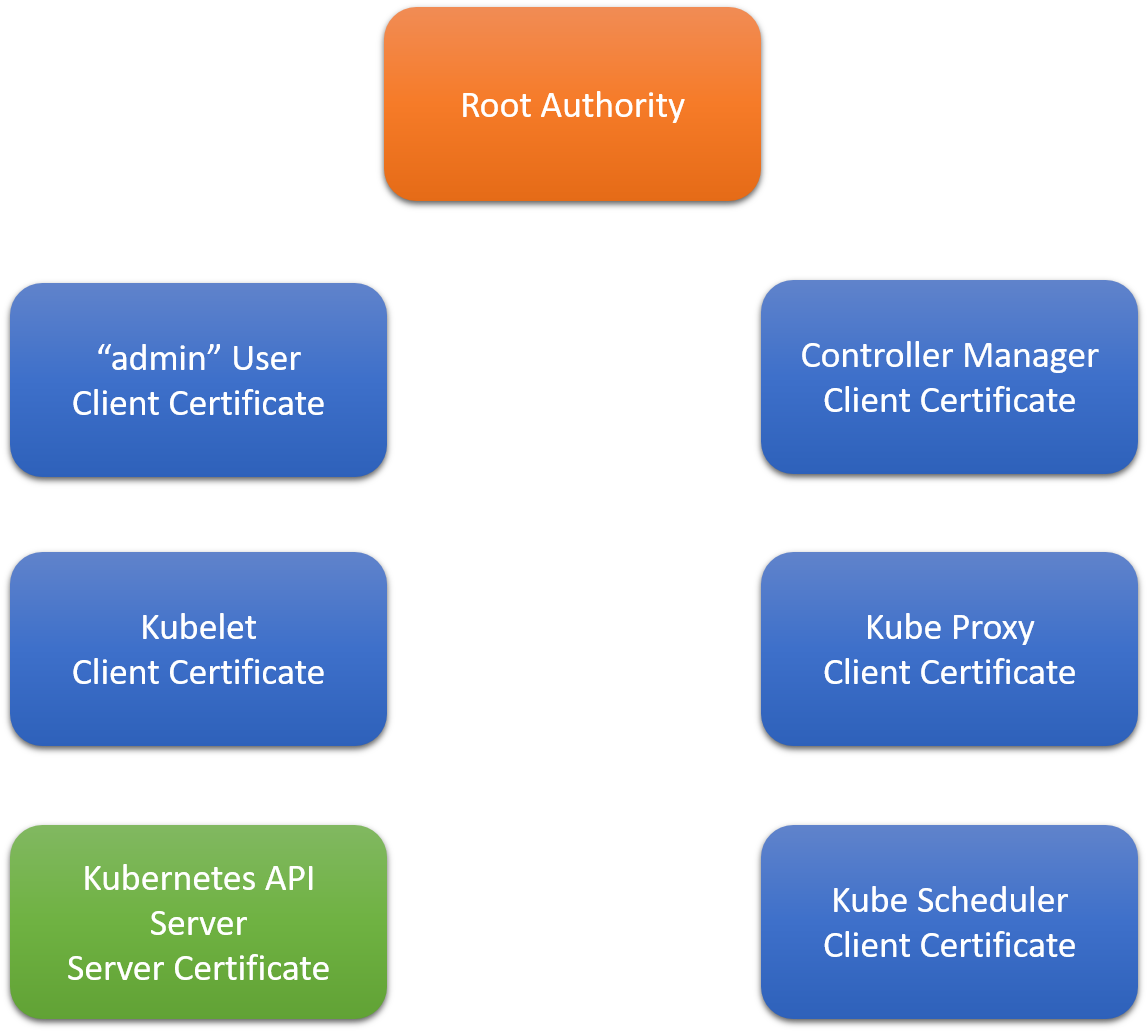
But first, we have to create Certificate Authority(CA) which e-signatures the certificates that we are going to generate.
$ cd ~/kubernetes-the-hard-way

$ wget -q https://raw.githubusercontent.com/veerendra2/k8s-the-hard-way-blog/master/certificate_configs/ca-config.json
$ wget -q https://raw.githubusercontent.com/veerendra2/k8s-the-hard-way-blog/master/certificate_configs/ca-csr.json

## Generate CA
$ cfssl gencert -initca ca-csr.json | cfssljson -bare ca
$ ls
ca-key.pem ca.pem
Admin User Client Certificate
$ cd ~/kubernetes-the-hard-way

$ wget -q https://raw.githubusercontent.com/veerendra2/k8s-the-hard-way-blog/master/certificate_configs/admin-csr.json
$ cfssl gencert \
  -ca=ca.pem \
  -ca-key=ca-key.pem \
  -config=ca-config.json \
  -profile=kubernetes \
  admin-csr.json | cfssljson -bare admin
$ ls
admin-key.pem admin.pem
Kubelet Client Certificates
As docs says
K8s uses node authorization which is a special-purpose authorization mode that specifically authorizes API requests made by kubelets
In order to be authorized by the Node Authorizer, Kubelets must use a credential that identifies them as being in the
system:nodes group, with a username of system:node:<nodeName>. Let’s create a certificate and private key for each
worker node (In my case n1 and n2)
$ cd ~/kubernetes-the-hard-way

IFS=$'\n'
for line in `cat workers.txt`; do

instance=`echo $line | awk '{print $1}'`
INTERNAL_IP=`echo $line | awk '{print $2}'`

cat > ${instance}-csr.json <<EOF
{
  "CN": "system:node:${instance}",
  "key": {
    "algo": "rsa",
    "size": 2048
  },
  "names": [
    {
      "C": "Westeros",
      "L": "The North",
      "O": "system:nodes",
      "OU": "Kubernetes The Hard Way",
      "ST": "Winterfell"
    }
  ]
}
EOF

cfssl gencert \
  -ca=ca.pem \
  -ca-key=ca-key.pem \
  -config=ca-config.json \
  -hostname=${instance},${INTERNAL_IP} \
  -profile=kubernetes \
  ${instance}-csr.json | cfssljson -bare ${instance}
done

$ ls
n1-key.pem n1.pem n2-key.pem n2.pem
Controller Manager Client Certificate
$ cd ~/kubernetes-the-hard-way

$ wget -q https://raw.githubusercontent.com/veerendra2/k8s-the-hard-way-blog/master/certificate_configs/kube-controller-manager-csr.json
# Generate Certificate
$ cfssl gencert \
  -ca=ca.pem \
  -ca-key=ca-key.pem \
  -config=ca-config.json \
  -profile=kubernetes \
  kube-controller-manager-csr.json | cfssljson -bare kube-controller-manager
$ ls
kube-controller-manager-key.pem kube-controller-manager.pem
Kube Proxy Client Certificate
$ cd ~/kubernetes-the-hard-way

$ wget -q https://raw.githubusercontent.com/veerendra2/k8s-the-hard-way-blog/master/certificate_configs/kube-proxy-csr.json
# Generate Certificate
$ cfssl gencert \
  -ca=ca.pem \
  -ca-key=ca-key.pem \
  -config=ca-config.json \
  -profile=kubernetes \
  kube-proxy-csr.json | cfssljson -bare kube-proxy
$ ls
kube-proxy-key.pem kube-proxy.pem
Scheduler Client Certificate
$ cd ~/kubernetes-the-hard-way

$ wget -q https://raw.githubusercontent.com/veerendra2/k8s-the-hard-way-blog/master/certificate_configs/kube-scheduler-csr.json
# Generate Certificate
$ cfssl gencert \
  -ca=ca.pem \
  -ca-key=ca-key.pem \
  -config=ca-config.json \
  -profile=kubernetes \
  kube-scheduler-csr.json | cfssljson -bare kube-scheduler
$ ls
kube-scheduler-key.pem kube-scheduler.pem
Kubernetes API Server Certificate
kube-api server certificate’s hostname should include the following things
- All controller’s hostname
- All controller’s IP
- Load balancer’s hostname
- Load balancer’s IP
- Kubernetes’s service(Both ‘service name’ and IP which are 10.32.0.1 and
kubernetes.default) - localhost
$ cd ~/kubernetes-the-hard-way

## CERT_HOSTNAME=10.32.0.1,<master node 1 Private IP>,<master node 1 hostname>,<master node 2 Private IP>,<master node 2 hostname>,<API load balancer Private IP>,<API load balancer hostname>,127.0.0.1,localhost,kubernetes.default
$ CERT_HOSTNAME=10.32.0.1,m1,10.200.1.10,m2,10.200.1.11,proxy,10.200.1.15,127.0.0.1,localhost,kubernetes.default
$ wget -q https://raw.githubusercontent.com/veerendra2/k8s-the-hard-way-blog/master/certificate_configs/kubernetes-csr.json
$ cfssl gencert \
  -ca=ca.pem \
  -ca-key=ca-key.pem \
  -config=ca-config.json \
  -hostname=${CERT_HOSTNAME} \
  -profile=kubernetes \
  kubernetes-csr.json | cfssljson -bare kubernetes
$ ls
Service Account Key Pair
Service account key pair certificate is used to sign service account tokens
$ cd ~/kubernetes-the-hard-way

$ wget -q https://raw.githubusercontent.com/veerendra2/k8s-the-hard-way-blog/master/certificate_configs/service-account-csr.json
$ cfssl gencert \
  -ca=ca.pem \
  -ca-key=ca-key.pem \
  -config=ca-config.json \
  -profile=kubernetes \
  service-account-csr.json | cfssljson -bare service-account
$ ls
service-account-key.pem service-account.pem
Copy Certificates to Nodes
$ cd ~/kubernetes-the-hard-way

# Minion
$ IFS=$'\n'
$ for line in `cat workers.txt`; do
   instance=`echo $line | awk '{print $1}'`
   user=`echo $line | awk '{print $3}'`
   rsync -zvhe ssh ca.pem ${instance}-key.pem ${instance}.pem ${user}@${instance}:~/
done
# Master
$ IFS=$'\n'
$ for instance in `cat controllers.txt`; do
   instance=`echo $line | awk '{print $1}'`
   user=`echo $line | awk '{print $3}'`
   rsync -zvhe ssh ca.pem ca-key.pem kubernetes-key.pem kubernetes.pem \
    service-account-key.pem service-account.pem ${user}@${instance}:~/
done
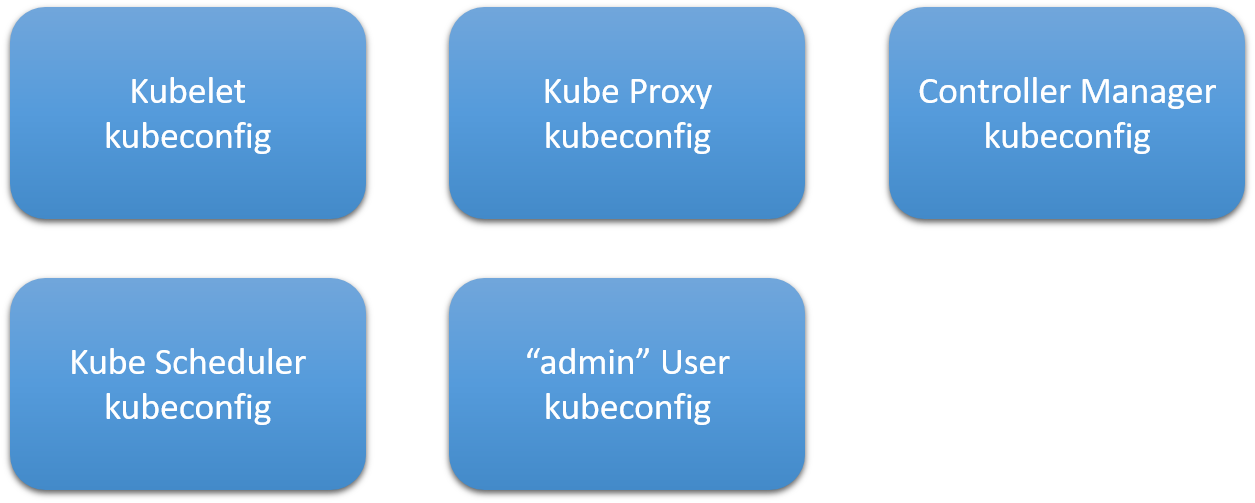
4. Generating kubeconfig Files for Authentication
kubeconfig is used for
authentication between the kubernetes components and users-to-kubernetes. kubeconfig consists of mainly 3 things | No. |
Entity | Description | | — | ——- |
———————————————————————————————————– | | 1 |
Cluster | api-server’s IP and its certificate which encodes in base64 | | 2 | Users | User related info like who is
authenticating, their certificate and key or service account token | | 3 | Context | Holds Cluster’s and User’s
reference. If you have multiple clusters and users, this context becomes handy |
In this section, we are going to generate kubeconfig for the below components
Generating kubelet kubeconfig
The user in kubeconfig should be system:node:<Worker_name> which should match the Kubelet hostname that we specified
while generating the kubelet client certificate. This will ensure Kubelets are properly authorized by the Kubernetes
Node Authorizer.
$ cd ~/kubernetes-the-hard-way

$ KUBERNETES_PUBLIC_ADDRESS=`cat nginx_proxy.txt | awk '{print $2}'`

$ IFS=$'\n'
$ for instance in `cat workers.txt`; do

  instance=`echo $line | awk '{print $1}'`

  kubectl config set-cluster kubernetes-the-hard-way \
    --certificate-authority=ca.pem \
    --embed-certs=true \
    --server=https://${KUBERNETES_PUBLIC_ADDRESS}:6443 \
    --kubeconfig=${instance}.kubeconfig

  kubectl config set-credentials system:node:${instance} \
    --client-certificate=${instance}.pem \
    --client-key=${instance}-key.pem \
    --embed-certs=true \
    --kubeconfig=${instance}.kubeconfig

  kubectl config set-context default \
    --cluster=kubernetes-the-hard-way \
    --user=system:node:${instance} \
    --kubeconfig=${instance}.kubeconfig

  kubectl config use-context default --kubeconfig=${instance}.kubeconfig
done
$ ls
n1.kubeconfig n2.kubeconfig
Generate kube-proxy kubeconfig
$ cd ~/kubernetes-the-hard-way

$ KUBERNETES_PUBLIC_ADDRESS=`cat nginx_proxy.txt | awk '{print $2}'`

$ {
  kubectl config set-cluster kubernetes-the-hard-way \
    --certificate-authority=ca.pem \
    --embed-certs=true \
    --server=https://${KUBERNETES_PUBLIC_ADDRESS}:6443 \
    --kubeconfig=kube-proxy.kubeconfig

  kubectl config set-credentials system:kube-proxy \
    --client-certificate=kube-proxy.pem \
    --client-key=kube-proxy-key.pem \
    --embed-certs=true \
    --kubeconfig=kube-proxy.kubeconfig

  kubectl config set-context default \
    --cluster=kubernetes-the-hard-way \
    --user=system:kube-proxy \
    --kubeconfig=kube-proxy.kubeconfig

  kubectl config use-context default --kubeconfig=kube-proxy.kubeconfig
}
$ ls
kube-proxy.kubeconfig
Generate kube-controller-manager kubeconfig
$ cd ~/kubernetes-the-hard-way

{
  kubectl config set-cluster kubernetes-the-hard-way \
    --certificate-authority=ca.pem \
    --embed-certs=true \
    --server=https://127.0.0.1:6443 \
    --kubeconfig=kube-controller-manager.kubeconfig

  kubectl config set-credentials system:kube-controller-manager \
    --client-certificate=kube-controller-manager.pem \
    --client-key=kube-controller-manager-key.pem \
    --embed-certs=true \
    --kubeconfig=kube-controller-manager.kubeconfig

  kubectl config set-context default \
    --cluster=kubernetes-the-hard-way \
    --user=system:kube-controller-manager \
    --kubeconfig=kube-controller-manager.kubeconfig

  kubectl config use-context default --kubeconfig=kube-controller-manager.kubeconfig
}
$ ls
kube-controller-manager.kubeconfig
Generate kube-scheduler kubeconfig
$ cd ~/kubernetes-the-hard-way

$ {
  kubectl config set-cluster kubernetes-the-hard-way \
    --certificate-authority=ca.pem \
    --embed-certs=true \
    --server=https://127.0.0.1:6443 \
    --kubeconfig=kube-scheduler.kubeconfig

  kubectl config set-credentials system:kube-scheduler \
    --client-certificate=kube-scheduler.pem \
    --client-key=kube-scheduler-key.pem \
    --embed-certs=true \
    --kubeconfig=kube-scheduler.kubeconfig

  kubectl config set-context default \
    --cluster=kubernetes-the-hard-way \
    --user=system:kube-scheduler \
    --kubeconfig=kube-scheduler.kubeconfig

  kubectl config use-context default --kubeconfig=kube-scheduler.kubeconfig
}
$ ls
kube-scheduler.kubeconfig
Generate admin kubeconfig
$ cd ~/kubernetes-the-hard-way

$ {
  kubectl config set-cluster kubernetes-the-hard-way \
    --certificate-authority=ca.pem \
    --embed-certs=true \
    --server=https://127.0.0.1:6443 \
    --kubeconfig=admin.kubeconfig

  kubectl config set-credentials admin \
    --client-certificate=admin.pem \
    --client-key=admin-key.pem \
    --embed-certs=true \
    --kubeconfig=admin.kubeconfig

  kubectl config set-context default \
    --cluster=kubernetes-the-hard-way \
    --user=admin \
    --kubeconfig=admin.kubeconfig

  kubectl config use-context default --kubeconfig=admin.kubeconfig
}
$ ls
admin.kubeconfig
Copy kubeconfig files to nodes
$ cd ~/kubernetes-the-hard-way

$ IFS=$'\n'
$ for line in `cat workers.txt`; do
  instance=`echo $line | awk '{print $1}'`
  user=`echo $line | awk '{print $3}'`
  rsync -zvhe ssh ${instance}.kubeconfig kube-proxy.kubeconfig ${user}@${instance}:~/
done

$ for instance in `cat controllers.txt`; do
  instance=`echo $line | awk '{print $1}'`
  user=`echo $line | awk '{print $3}'`
  rsync -zvhe ssh admin.kubeconfig kube-controller-manager.kubeconfig kube-scheduler.kubeconfig ${user}@${instance}:~/
done
5. Generating the Data Encryption Config and Key
Kubernetes stores different types of data including cluster state, application configurations, and secrets. Kubernetes supports the ability to encrypt cluster data at rest. In this section, we will generate an encryption key and an encryption config suitable for encrypting Kubernetes Secrets.
The Encrypted Key
ENCRYPTION_KEY=$(head -c 32 /dev/urandom | base64)
The Encryption Config File
cat > encryption-config.yaml <<EOF
kind: EncryptionConfig
apiVersion: v1
resources:
  - resources:
      - secrets
    providers:
      - aescbc:
          keys:
            - name: key1
              secret: ${ENCRYPTION_KEY}
      - identity: {}
EOF
Copy to Controller Nodes
$ IFS=$'\n'
$ for instance in `cat controller.txt`; do
  instance=`echo $line | awk '{print $1}'`
  user=`echo $line | awk '{print $3}'`
  rsync -zvhe ssh encryption-config.yaml ${user}@${instance}:~/
done
Till now we have done following things
- Provisioned compute resources
- Generated certificates
- Generated kubeconfig files
- Copied certificate files and kubeconfigs to nodes
In the next post, we will bootstrap controller nodes