Welcome back to “Kubernetes-The Hard Way With Docker & Flannel” series part 2. In previous post we have provisioned compute resources, generated certificates and kubeconfig files. In this post, we will install and configure controller nodes
6. Bootstrapping the etcd Cluster
etcd is a consistent and highly-available key value storage DB. Kubernetes stores all
cluster data in etcd via api-server. In this section, we will install and configure etcd on all controller nodes.
*NOTE: The below commands must run on all controller nodes
*TIP: You can use tumx to run command on multiple nodes at same time
## On controller nodes
$ wget -q --show-progress --https-only --timestamping \
  "https://github.com/coreos/etcd/releases/download/v3.3.9/etcd-v3.3.9-linux-amd64.tar.gz"
$ tar -xvf etcd-v3.3.9-linux-amd64.tar.gz
$ sudo mv etcd-v3.3.9-linux-amd64/etcd* /usr/local/bin/
$ sudo mkdir -p /etc/etcd /var/lib/etcd
$ sudo cp ca.pem kubernetes-key.pem kubernetes.pem /etc/etcd/
Set up the following environment variables which are usefull generate etcd systemd unit file
## On controller nodes
$ ETCD_NAME=`hostname`
$ INTERNAL_IP=`hostname -i` # IP of the current node
#INITIAL_CLUSTER=<controller 1 hostname>=https://<controller 1 private ip>:2380,<controller 2 hostname>=https://<controller 2 private ip>:2380
$ INITIAL_CLUSTER=m1=https://10.200.1.10:2380,m2=https://10.200.1.11:2380
Create a systemd unit file
## On controller nodes
$ cat << EOF | sudo tee /etc/systemd/system/etcd.service
[Unit]
Description=etcd
Documentation=https://github.com/coreos

[Service]
ExecStart=/usr/local/bin/etcd \\
  --name ${ETCD_NAME} \\
  --cert-file=/etc/etcd/kubernetes.pem \\
  --key-file=/etc/etcd/kubernetes-key.pem \\
  --peer-cert-file=/etc/etcd/kubernetes.pem \\
  --peer-key-file=/etc/etcd/kubernetes-key.pem \\
  --trusted-ca-file=/etc/etcd/ca.pem \\
  --peer-trusted-ca-file=/etc/etcd/ca.pem \\
  --peer-client-cert-auth \\
  --client-cert-auth \\
  --initial-advertise-peer-urls https://${INTERNAL_IP}:2380 \\
  --listen-peer-urls https://${INTERNAL_IP}:2380 \\
  --listen-client-urls https://${INTERNAL_IP}:2379,https://127.0.0.1:2379 \\
  --advertise-client-urls https://${INTERNAL_IP}:2379 \\
  --initial-cluster-token etcd-cluster-0 \\
  --initial-cluster ${INITIAL_CLUSTER} \\
  --initial-cluster-state new \\
  --data-dir=/var/lib/etcd
Restart=on-failure
RestartSec=5

[Install]
WantedBy=multi-user.target
EOF
Start the etcd service
## On controller nodes
$ {
  sudo systemctl daemon-reload
  sudo systemctl enable etcd
  sudo systemctl start etcd
}
Once etcd installation and configuration are done in all controller nodes, verify that etcd cluster is working
properly
## On controller nodes
$ sudo ETCDCTL_API=3 etcdctl member list \
  --endpoints=https://127.0.0.1:2379 \
  --cacert=/etc/etcd/ca.pem \
  --cert=/etc/etcd/kubernetes.pem \
  --key=/etc/etcd/kubernetes-key.pem
You should see output like below

7. Bootstrapping the Kubernetes Control Plane
The control plane binaries are
Download control plane binaries
*NOTE: The below commands must run on all controller nodes
## On controller nodes
$ sudo mkdir -p /etc/kubernetes/config
$ KUBERNETES_VERSION=v1.10.13
$ wget -q --show-progress --https-only --timestamping \
  "https://dl.k8s.io/${KUBERNETES_VERSION}/bin/linux/amd64/kube-apiserver" \
  "https://dl.k8s.io/${KUBERNETES_VERSION}/bin/linux/amd64/kube-controller-manager" \
  "https://dl.k8s.io/${KUBERNETES_VERSION}/bin/linux/amd64/kube-scheduler" \
  "https://dl.k8s.io/${KUBERNETES_VERSION}/bin/linux/amd64/kubectl"
*TIP: You can get version number from kubernetes releases page
Move the binaries to /usr/local/bin/
## On controller nodes
$ chmod +x kube-apiserver kube-controller-manager kube-scheduler kubectl
$ sudo mv kube-apiserver kube-controller-manager kube-scheduler kubectl /usr/local/bin/
Kubernetes API Server Configuration
Move certificates to kubernetes directory
## On controller nodes
$ sudo mkdir -p /var/lib/kubernetes/
$ sudo mv ca.pem ca-key.pem kubernetes-key.pem kubernetes.pem \
    service-account-key.pem service-account.pem \
    encryption-config.yaml /var/lib/kubernetes/
Create a kube-api server systemd unit file.
## On controller nodes
$ CONTROLLER0_IP=10.200.1.10
$ CONTROLLER1_IP=10.200.1.11
$ INTERNAL_IP=`hostname -i`  # Current node's IP

$ cat << EOF | sudo tee /etc/systemd/system/kube-apiserver.service
[Unit]
Description=Kubernetes API Server
Documentation=https://github.com/kubernetes/kubernetes

[Service]
ExecStart=/usr/local/bin/kube-apiserver \\
  --advertise-address=${INTERNAL_IP} \\
  --allow-privileged=true \\
  --apiserver-count=3 \\
  --audit-log-maxage=30 \\
  --audit-log-maxbackup=3 \\
  --audit-log-maxsize=100 \\
  --audit-log-path=/var/log/audit.log \\
  --authorization-mode=Node,RBAC \\
  --bind-address=0.0.0.0 \\
  --client-ca-file=/var/lib/kubernetes/ca.pem \\
  --enable-admission-plugins=Initializers,NamespaceLifecycle,NodeRestriction,LimitRanger,ServiceAccount,DefaultStorageClass,ResourceQuota \\
  --enable-swagger-ui=true \\
  --etcd-cafile=/var/lib/kubernetes/ca.pem \\
  --etcd-certfile=/var/lib/kubernetes/kubernetes.pem \\
  --etcd-keyfile=/var/lib/kubernetes/kubernetes-key.pem \\
  --etcd-servers=https://$CONTROLLER0_IP:2379,https://$CONTROLLER1_IP:2379 \\
  --event-ttl=1h \\
  --experimental-encryption-provider-config=/var/lib/kubernetes/encryption-config.yaml \\
  --kubelet-certificate-authority=/var/lib/kubernetes/ca.pem \\
  --kubelet-client-certificate=/var/lib/kubernetes/kubernetes.pem \\
  --kubelet-client-key=/var/lib/kubernetes/kubernetes-key.pem \\
  --kubelet-https=true \\
  --runtime-config=api/all \\
  --service-account-key-file=/var/lib/kubernetes/service-account.pem \\
  --service-cluster-ip-range=10.32.0.0/24 \\
  --service-node-port-range=30000-32767 \\
  --tls-cert-file=/var/lib/kubernetes/kubernetes.pem \\
  --tls-private-key-file=/var/lib/kubernetes/kubernetes-key.pem \\
  --v=2 \\
  --kubelet-preferred-address-types=InternalIP,InternalDNS,Hostname,ExternalIP,ExternalDNS
Restart=on-failure
RestartSec=5

[Install]
WantedBy=multi-user.target
EOF
Kubernetes Controller Manager Configuration
Move kubeconfig files to kubernetes directory
## On controller nodes
$ sudo mv kube-controller-manager.kubeconfig /var/lib/kubernetes/
Create kube-controller-manager systemd unit file
## On controller nodes
$ cat <<EOF | sudo tee /etc/systemd/system/kube-controller-manager.service
[Unit]
Description=Kubernetes Controller Manager
Documentation=https://github.com/kubernetes/kubernetes

[Service]
ExecStart=/usr/local/bin/kube-controller-manager \\
  --address=0.0.0.0 \\
  --cluster-cidr=10.200.0.0/16 \\
  --cluster-name=kubernetes \\
  --cluster-signing-cert-file=/var/lib/kubernetes/ca.pem \\
  --cluster-signing-key-file=/var/lib/kubernetes/ca-key.pem \\
  --kubeconfig=/var/lib/kubernetes/kube-controller-manager.kubeconfig \\
  --leader-elect=true \\
  --root-ca-file=/var/lib/kubernetes/ca.pem \\
  --service-account-private-key-file=/var/lib/kubernetes/service-account-key.pem \\
  --service-cluster-ip-range=10.32.0.0/24 \\
  --use-service-account-credentials=true \\
  --v=2
Restart=on-failure
RestartSec=5

[Install]
WantedBy=multi-user.target
EOF
Kubernetes Scheduler Configuration
Move kube-scheduler kubeconfig to kubernetes directory
# On controller nodes
$ sudo mv kube-scheduler.kubeconfig /var/lib/kubernetes/
Create kube-scheduler configuration file
## On controller nodes
$ cat <<EOF | sudo tee /etc/kubernetes/config/kube-scheduler.yaml
apiVersion: componentconfig/v1alpha1
kind: KubeSchedulerConfiguration
clientConnection:
  kubeconfig: "/var/lib/kubernetes/kube-scheduler.kubeconfig"
leaderElection:
  leaderElect: true
EOF
{% endhighlight %}
Create kube-scheduler systemd unit file
{% highlight shell %}
# On controller nodes

$ cat <<EOF | sudo tee /etc/systemd/system/kube-scheduler.service
[Unit]
Description=Kubernetes Scheduler
Documentation=https://github.com/kubernetes/kubernetes

[Service]
ExecStart=/usr/local/bin/kube-scheduler \\
  --config=/etc/kubernetes/config/kube-scheduler.yaml \\
  --v=2
Restart=on-failure
RestartSec=5

[Install]
WantedBy=multi-user.target
EOF
Start the controller services
## On controller nodes
$ sudo systemctl daemon-reload
$ sudo systemctl enable kube-apiserver kube-controller-manager kube-scheduler
$ sudo systemctl start kube-apiserver kube-controller-manager kube-scheduler
Enable HTTP Health Checks
In the original “Kubernetes The Hard Way”, Kelsey used a GCP load balancer to load balance the requests among controllers. Since it is difficult to set up HTTPS health checks on the GCP network load balancer and kube-apiserver supports only HTTPS health checks. He created HTTP Nginx proxy for kube-api server, GCP network load balancer performs a health check via HTTP Nginx proxy. But in our case, we can skip this step since we are not using a GCP network load balancer
Verification
Check the component’s status using the below commands.
## On controller nodes
$ kubectl get componentstatuses --kubeconfig admin.kubeconfig
Run the above command on all controller nodes and verify statuses which should be like below

RBAC for Kubelet Authorization
In this section, we will configure RBAC permissions to allow the kube-api server to access the Kubelet API on each worker node. Access to the Kubelet API is required for retrieving metrics, logs, and executing commands in pods.
Create the system:kube-apiserver-to-kubelet ClusterRole with permissions to access the Kubelet.
## On controller nodes
$ cat <<EOF | kubectl apply --kubeconfig admin.kubeconfig -f -
apiVersion: rbac.authorization.k8s.io/v1beta1
kind: ClusterRole
metadata:
  annotations:
    rbac.authorization.kubernetes.io/autoupdate: "true"
  labels:
    kubernetes.io/bootstrapping: rbac-defaults
  name: system:kube-apiserver-to-kubelet
rules:
  - apiGroups:
      - ""
    resources:
      - nodes/proxy
      - nodes/stats
      - nodes/log
      - nodes/spec
      - nodes/metrics
    verbs:
      - "*"
EOF
The kube-api server authenticates to the Kubelet as the “kubernetes” user using the client certificate as defined by the
--kubelet-client-certificate flag which has been defined in the kube-apiserver systemd unit file above.
Bind the system:kube-apiserver-to-kubelet ClusterRole to the kubernetes user:
## On controller nodes
$ cat <<EOF | kubectl apply --kubeconfig admin.kubeconfig -f -
apiVersion: rbac.authorization.k8s.io/v1beta1
kind: ClusterRoleBinding
metadata:
  name: system:kube-apiserver
  namespace: ""
roleRef:
  apiGroup: rbac.authorization.k8s.io
  kind: ClusterRole
  name: system:kube-apiserver-to-kubelet
subjects:
  - apiGroup: rbac.authorization.k8s.io
    kind: User
    name: kubernetes
EOF
The Kubernetes Frontend Load Balancer
As I said earlier, we are not going to use a GCP load network load balancer, but we are going to use the nginx docker container on the host(Laptop) to load balance the requests.
In this section, we will build an nginx docker image with the appropriate configuration to load balance requests among
controller nodes(m1 and m2)
nginx configuration
Specify controllers IPs with kube-api server’s port in nginx configuration like below
## On host
cd ~/kubernetes-the-hard-way

$ cat <<EOF | tee kubernetes.conf
stream {
    upstream kubernetes {
        server 10.200.1.10:6443;
        server 10.200.1.11:6443;
    }
    server {
        listen 6443;
        listen 443;
        proxy_pass kubernetes;
    }
}
EOF
Dockerfile
Create Dockerfile to build nginx load balancer docker image
# On host
$ cd ~/kubernetes-the-hard-way

$ cat <<EOF | tee Dockerfile
FROM nginx:latest
MAINTAINER Veerendra Kakumanu

RUN mkdir -p /etc/nginx/tcpconf.d && echo "include /etc/nginx/tcpconf.d/*;" >> /etc/nginx/nginx.conf
COPY kubernetes.conf /etc/nginx/tcpconf.d/kubernetes.conf
EOF
Build and launch the container
# On host
$ cd ~/kubernetes-the-hard-way

$ sudo docker build -t nginx_proxy .
$ sudo docker run -it -d -h proxy --net br0 --ip 10.200.1.15 nginx-proxy
Verification
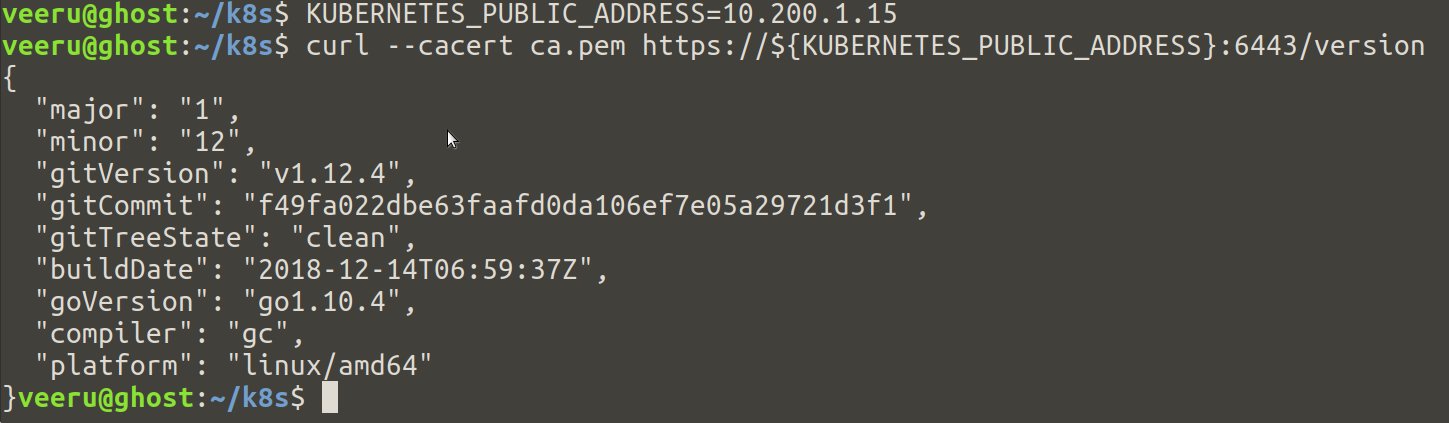
curl the HTTPS endpoint of the load balancer(Nginx docker container) which forwards the requests to the controller
node with certificate.
## On host
$ KUBERNETES_PUBLIC_ADDRESS=10.200.1.15
$ curl --cacert ca.pem https://${KUBERNETES_PUBLIC_ADDRESS}:6443/version
If everything is good, you should see the output below.
In this post, we have successfully provisioned controller nodes and load balancers. We will bootstrap the worker nodes in the next post